ACLs Management
Managing Access Control Lists (ACLs)
In the FlexSDS architecture, ACLs (Access Control Lists) are used to manage access permissions for storage containers, which serve as the foundation for both storage volumes and Distributed File Systems (DFS). Because volumes and DFS instances inherit access controls from their containers, ACL management is handled in the same way for both.
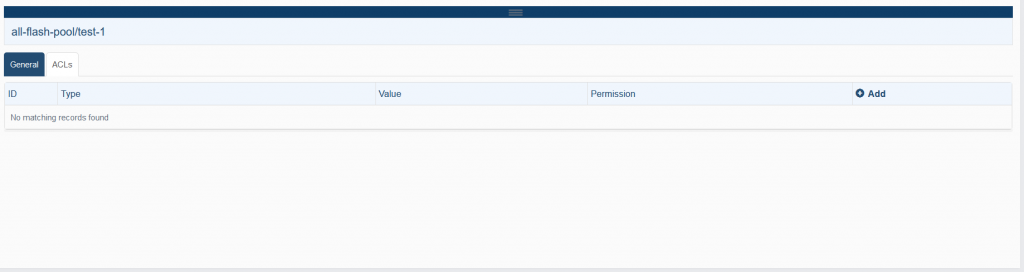
Accessing ACL Management
To manage ACLs:
Navigate to the FlexSDS Web Management Platform.
Select a Volume or DFS from the main interface.
Go to the ACL tab to view and manage existing access rules.
ACLs can be configured using different methods depending on the type of target attached to the container. Supported methods include:
CHAP – Username and secret-based authorization for iSCSI/iSER targets.
IP Address – IP-based filtering, applicable to iSCSI, iSER, NVMe-oF, and NFS.
Host (Initiator Name) – Hostname or initiator-based access control for SAN protocols like iSCSI, iSER, and NVMe-oF.
Adding ACL Entries
Add CHAP User
Click the Add button at the top-right of the ACL list.
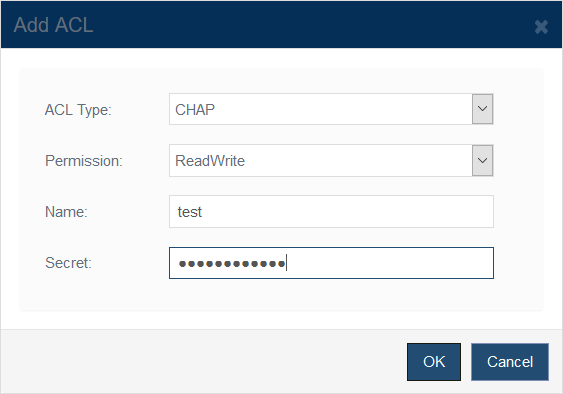
In the Add ACL dialog, select CHAP from the “ACL Type” dropdown.
Fill in the following details:
Permission: Choose either Read-Write or Read-Only.
Username: Specify the CHAP user.
Secret: Enter the shared secret for the user.
Click OK to apply.
Add IP Address Rule
Click the Add button at the top-right of the ACL list.
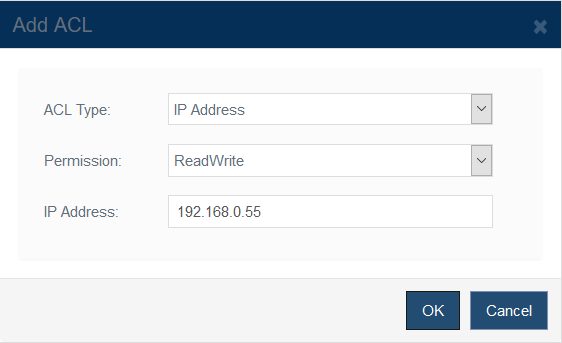
Click the Add button at the top-right of the ACL list.
In the Add ACL dialog, select IP Address from the “ACL Type” dropdown.
Provide the following:
Permission: Read-Write or Read-Only.
IP Address: Specify the client IP to authorize.
Click OK to apply.
Add Host (Initiator) Rule
Click the Add button at the top-right of the ACL list.
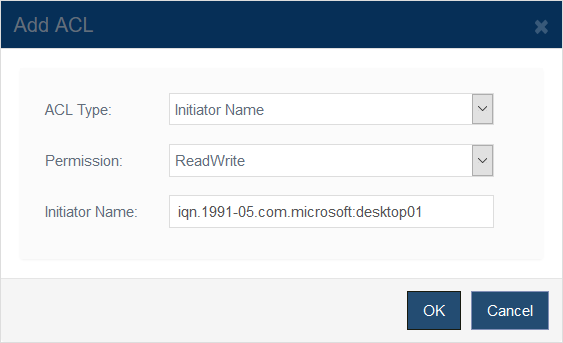
In the Add ACL dialog, select Initiator Name from the “ACL Type” dropdown.
Provide the following:
Permission: Read-Write or Read-Only.
Initiator Name: Specify the SAN initiator name.
Click OK to apply.
Managing Existing ACLs

Delete an existing ACL
Click the X icon next to the ACL entry.
Confirm the deletion in the pop-up dialog by clicking OK.
⚠️ Note: Deleting an ACL immediately revokes the associated access permission.